DPP TUTORIAL - HDR
USING HDR TOOL IN DPP (Window 7 64bit)
The HDR tool was introduce as the
latest DPP update v3.11.26 from Canon
with their OEM photo tool that come bundle with the Digital Photo Professional (DPP).
If you are not on that version it is advice that you update your DPP tool to
the latest version to get your DPP to be able to use this function. To be honest, this tool is
nothing if compared to 3rd party HDR software such as Photomatix Pro. It only gives
you the basic functionality. This version currently only enables you to merge 3
exposures only. But nothing beats free software.
Now, to create a HDR photo, you have to
understand the technique first before you can go to the software part. There’s
a lot of tutorial on the net on how to photograph a HDR photos. Just google for
that and after you understand or get a hang on it, u can test it out on your
DPP based on this tutorial of cos.
Open the DPP software and look
for the photo that you want to merge to HDR. In this tutorial i’ll gonna choose
a landscape photo. These was taken with my Canon EOS 60D.
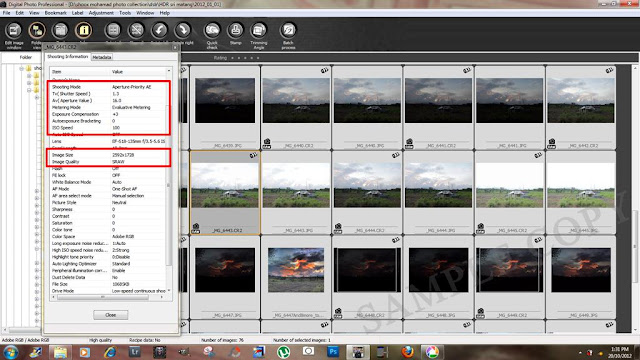
First we need to check if the photo is a part of the 3 photos that we taken. Right Click on the file and select “info”. Something like this would open for you to see the setting details. The setting used to photograph this is AV/aperture mode, Aperture set to F16, AEB +1/0/-1 in SRAW mode. Check the photo below for details.
If you have a bad memory mesmerizing numbers, i would recommend you to list down the file name of the 3 exposures that you choose.
After finish identifying which exposure to select in the HDR. Click the Tool tab and Select to start the HDR Tool.
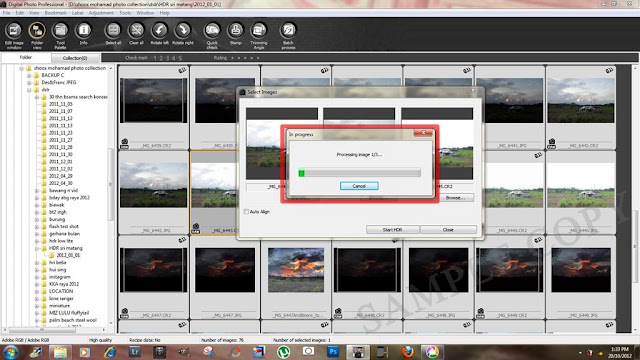
Now you know why i said to jot down the file name first. a window will open and ask you to pick the other 2 exposure. The other trick is to select the 3 file first by pressing "shift + select" or "ctrl+select" before starting the HDR tool.
the "Auto Align" check box should be selected if you do the AEB hand held. If you taken the shot with a tripod, you can just abandoned the checkbox. So now to see how does the 3 exposures ends as a HDR image. click the "Start HDR" button.
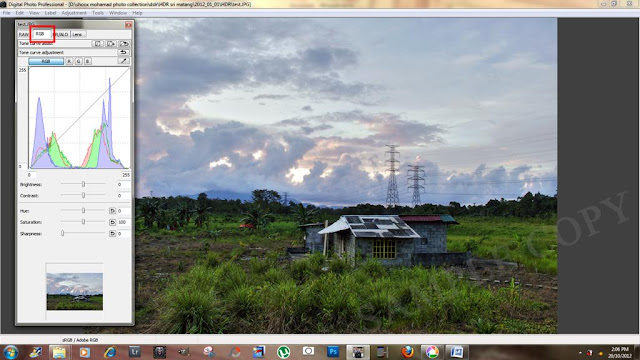
Now after the exposures merge process. The end file should look similar like this. The Natural preset is the default preset and there are a few other preset provide by Canon for your testing and to give some idea incase you dont see any different.
Here is some of the default setup for the preset;
1) Natural ; So from the name you should know the preset is to keep the photo as natural as it could but still produce the dynamic of a HDR photo.
2) Art Bold : add more contrast and details to the strengh of the photo.
3) Art Vivid : Add more saturation and colors to the photo.
4) Art Standard : Give balance to the brightness and saturation but still keeping the detail enhanced.
5) Art Embossed : Add more chrome effect to the photo by enhancing the brightness and contrast.
6) Custom : Experimenting with the slide bar till you find something that interest you. the Red box is to adjust the toning and colors. The green box is to enhance the details such as Unsharp Mask. I would recommend to select the natural preset and proceed in photoshop or Lightroom to enhance the colors and details. Or any third party software you can get on.
To save the end result is just by clicking the Save As button. you will have the authority to rename the file, select the location to save the jpeg file and change the resolution if you wish to resize it.
Now you have your first HDR photo ready to be posted to facebook.
If you dont like how the finishing end of the HDR photo. you can experiment more with other type of scene, lighting and colours.
Enjoy!!!


Thanks,i learn a lot....
ReplyDeleteOhh My God Your Still missing this app Muslim Pro Apk
ReplyDelete